Chapters
- Signup Form Builder: Design Forms
- Build and Publish Landing Pages
- Build and Embed Signup Forms
- Create and Display Popup Forms
- Create and Position Slide-in Forms
Contents
the email tool that makes email marketing simple


Build and Publish Landing Pages
Published: · Last updated: · By Marcus Biel
In brief
Learn how to build and publish a Maildroppa Landing Page with templates, custom domains, SEO settings, legal details, social previews, and a public link.
A Maildroppa Landing Page is a complete standalone page built around a signup form. You do not need an existing website to use it.
You can publish the page through Maildroppa and share its public link in advertisements, social media posts, QR codes, emails, messenger conversations, or buttons on another website. If you have connected a custom Landing Page domain, you can also publish the page on that domain.
This guide explains the functions that are unique to Landing Pages. Layouts, content blocks, text editing, form fields, tags, design settings, layers, and signup flows are explained once in the main Signup Form Builder guide.
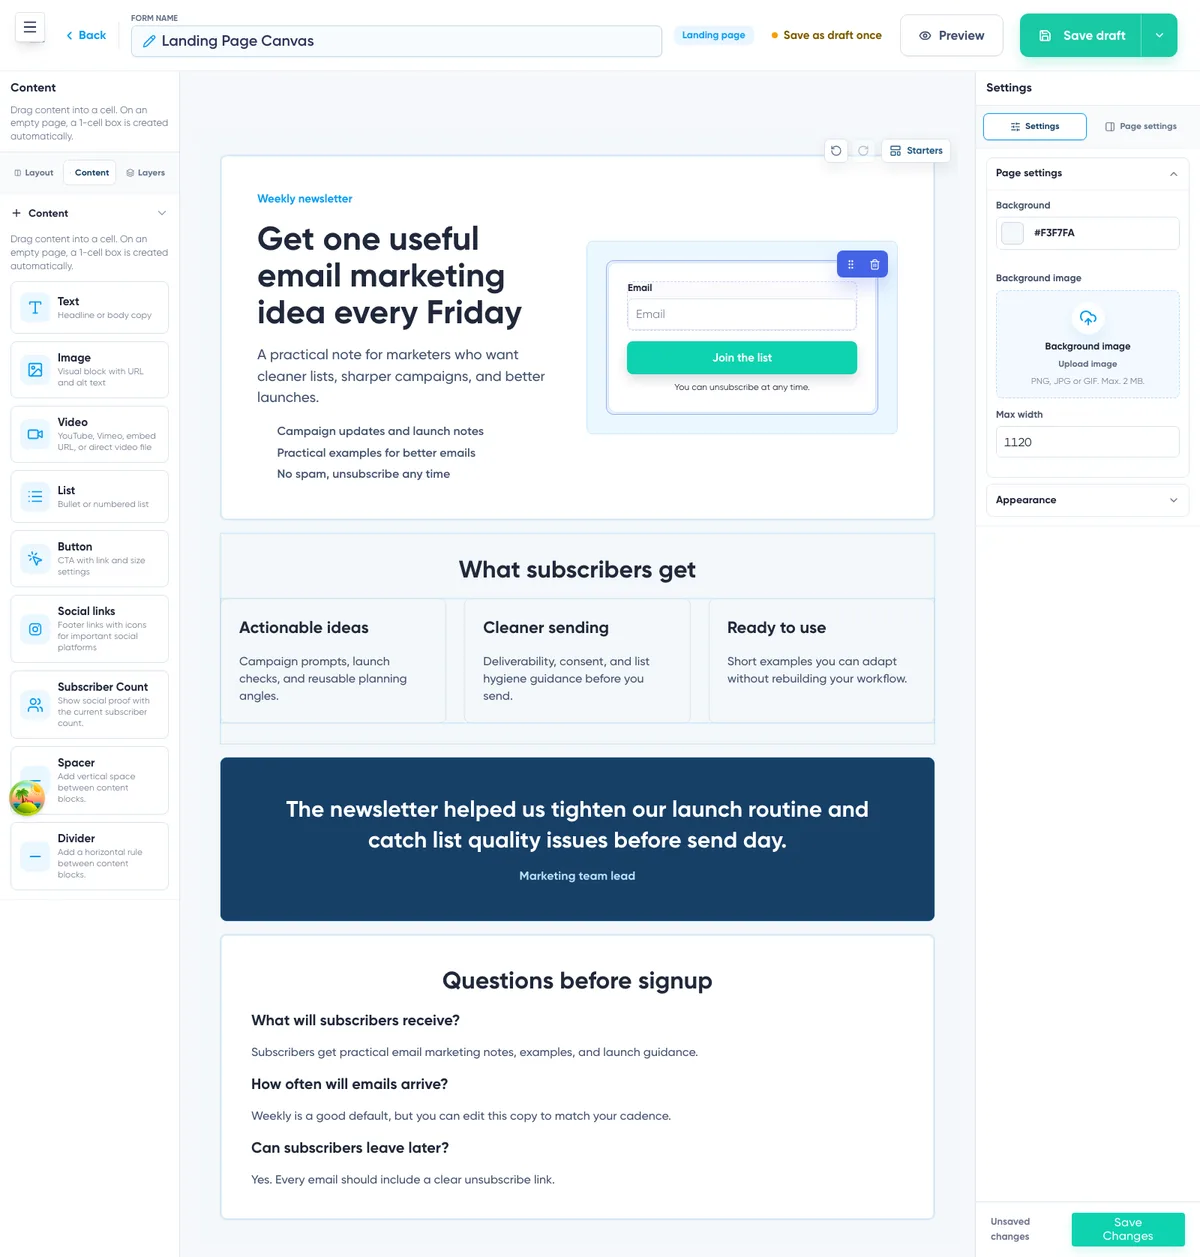
Creating a Landing Page
Open “Signup Forms”, click “Create Form”, and select “Landing Page”. Enter a clear internal name and continue to the builder.
You can also open an existing Landing Page by clicking its name in the Signup Forms Overview or selecting “Edit Form” from its actions menu.
The name identifies the page inside Maildroppa. It does not become the main heading of the public page, and renaming the Landing Page later does not automatically change its existing public address.
Choosing a Landing Page Template
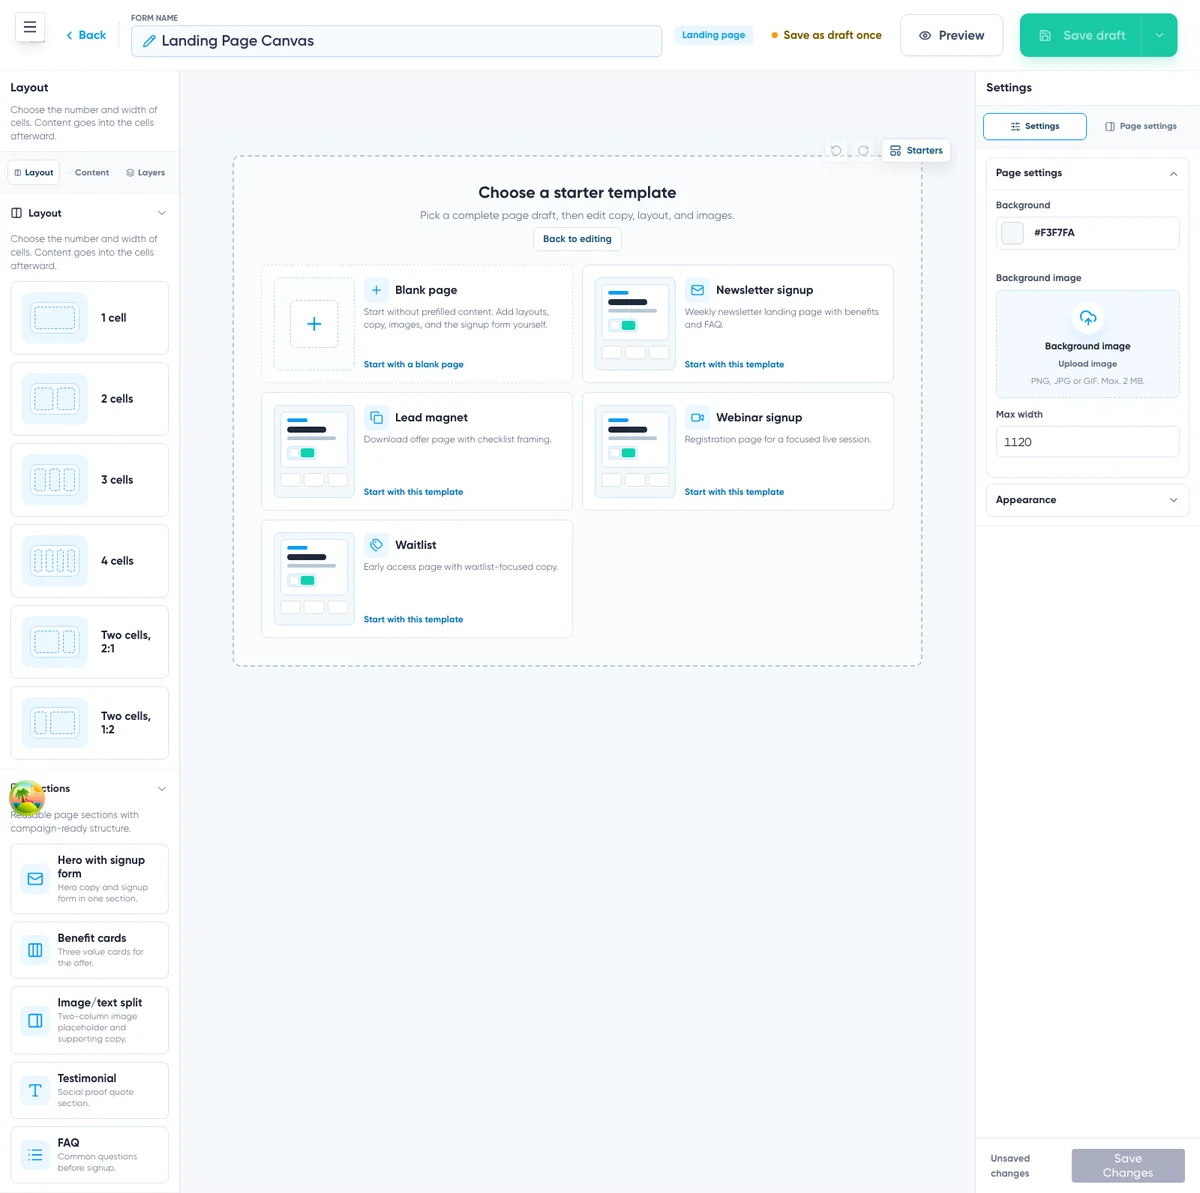
The Landing Page builder provides five starting points:
Blank Page — Starts with an empty canvas for a completely custom design.
Newsletter Signup — A general-purpose page for growing a newsletter audience.
Lead Magnet — A page designed around a downloadable offer or other signup incentive.
Webinar Signup — A registration page for a webinar, live training, or online event.
Waitlist — A page for collecting interest before a product, service, or event becomes available.
Choose the template whose structure is closest to your goal. All template content is editable. You can replace the text and images, change the design, rearrange sections, or remove anything you do not need.
Building the Page with Sections
Landing Pages have the same layout and content blocks as every other signup form, but they also provide complete reusable sections under “Layout”.
Hero with signup form — A prominent opening section that presents the offer and places the form near the main message.
Benefit cards — Three cards for explaining the most important advantages or outcomes.
Image/text split — A two-column section for combining an image with supporting copy.
Testimonial — A section for customer feedback, a quote, or other social proof.
FAQ — A question-and-answer section for resolving common concerns before signup.
Click a section to add it at the current insertion point, or drag it onto the canvas. The section is made from regular boxes, columns, text, images, lists, and other blocks, so every part can be edited separately afterward.
Use sections to create a simple progression:
- Explain the offer.
- Show why it is valuable.
- Answer likely questions or provide proof.
- Ask the visitor to sign up.
You do not need to use every section. A focused page with one clear offer is often easier to understand than a long page containing unrelated information.
Adding the Signup Form
A Landing Page must contain one signup form block. The block collects the visitor’s email address and any additional subscriber fields you choose.
Most templates already include the signup form. If you start with a blank page, open “Content” and add “Signup form”. Once the form exists, the builder prevents a second signup form block from being added.
Select the block to configure its fields, hidden tags, progress indicator, subscriber counter, input design, and submit button. These shared controls are covered in Configuring the Signup Form.
You can place supporting content above, below, or next to the form. Make sure the main heading and button clearly describe what the visitor receives after signing up.
Using Images, Video, and Supporting Content
Landing Pages can contain text, images, videos, lists, buttons, social links, subscriber counters, spacers, and dividers.
Images can be added from a URL, uploaded, or selected from the Maildroppa media library. Add meaningful alternative text when an image communicates useful information. You can also control its dimensions, aspect ratio, crop, focal point, link, rotation, and responsive display.
Video blocks support YouTube, Vimeo, embed URLs, and direct video files. A preview image and play-button style can be configured separately.
Buttons are useful when the page contains a secondary action, such as opening a product page or jumping to another resource. The signup form submit button remains the action that sends subscriber information to Maildroppa.
Use the standalone subscriber counter when the audience size should be part of the page content. If the number should appear directly next to the submit area, use the subscriber counter inside the signup form settings instead.
Setting the Page Appearance
Open “Page settings” in the right sidebar to define the overall page design.
You can set the page background color or image, background position and size, maximum page width, default fonts and colors, heading styles, link styles, button defaults, box styles, and mobile spacing. You can also choose when multi-column layouts should stack on smaller screens.
These defaults help the page feel consistent. You can still select an individual section, column, or content block and give it different colors, spacing, borders, or typography.
Use “Preview” regularly while editing. Check that the signup offer is understandable before scrolling, that the button is easy to find, and that images do not overpower the form.
Saving a Landing Page Draft
Landing Pages can be saved as drafts without being public.
The top bar shows the current save status while you work. Use “Save draft” when you want to save the current version explicitly. A draft can be previewed and edited, but visitors cannot open it through a public link until it is published.
If a page is already live, further design changes do not immediately replace the public version. Maildroppa marks them as unpublished changes. This lets you continue editing and previewing without changing what current visitors see. Use “Publish changes” when the new version is ready.

Opening the Publication Settings
Click “Publish” when the first version is ready. For an existing public page, the button can show “Publish changes” or “Manage publication”.
The publication window brings together everything needed to make the Landing Page public:
- Publication state
- Public address
- Signup flow and subscriber impact
- Search preview
- Social sharing image
- Favicon
- Hosted page legal profile
- Publication readiness
Maildroppa checks these settings before publication. If something required is missing, the “Ready to publish” section explains what needs attention and provides an action when possible.
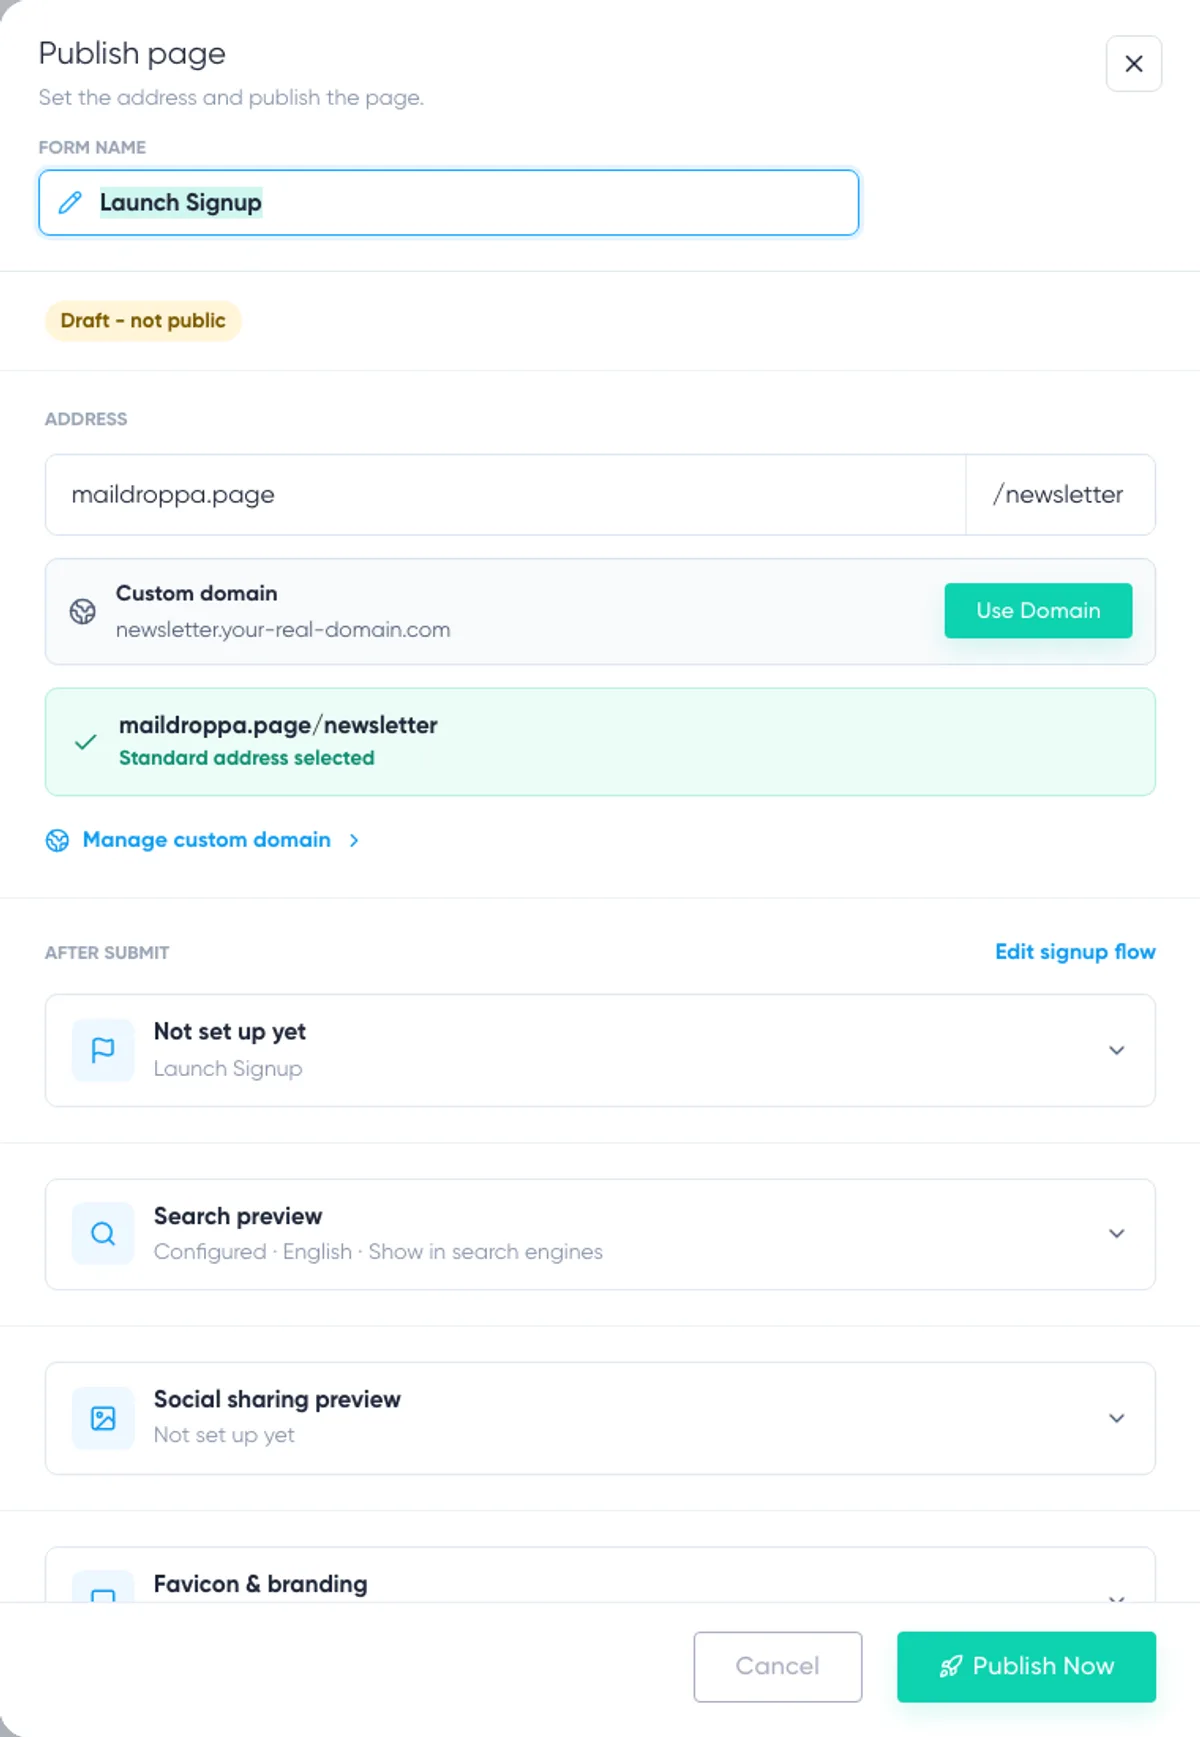
Choosing the Public Address
Every published Landing Page needs a unique public address.
Maildroppa can provide the standard Landing Page address for your account. If you have connected one or more custom Landing Page domains, you can select a ready domain and configure the page path.
For example, a custom address could use a path such as /newsletter, /webinar, or /summer-guide.
Maildroppa checks whether the selected address is available. If the path is already in use, the publication settings show the conflict and can offer alternative paths. A custom domain must be fully connected and ready before the page can be published on it.
Changing the address of an already published page changes where the page will be available after the next publication. Review the address warning carefully before publishing the change, especially if the old link has already been shared.
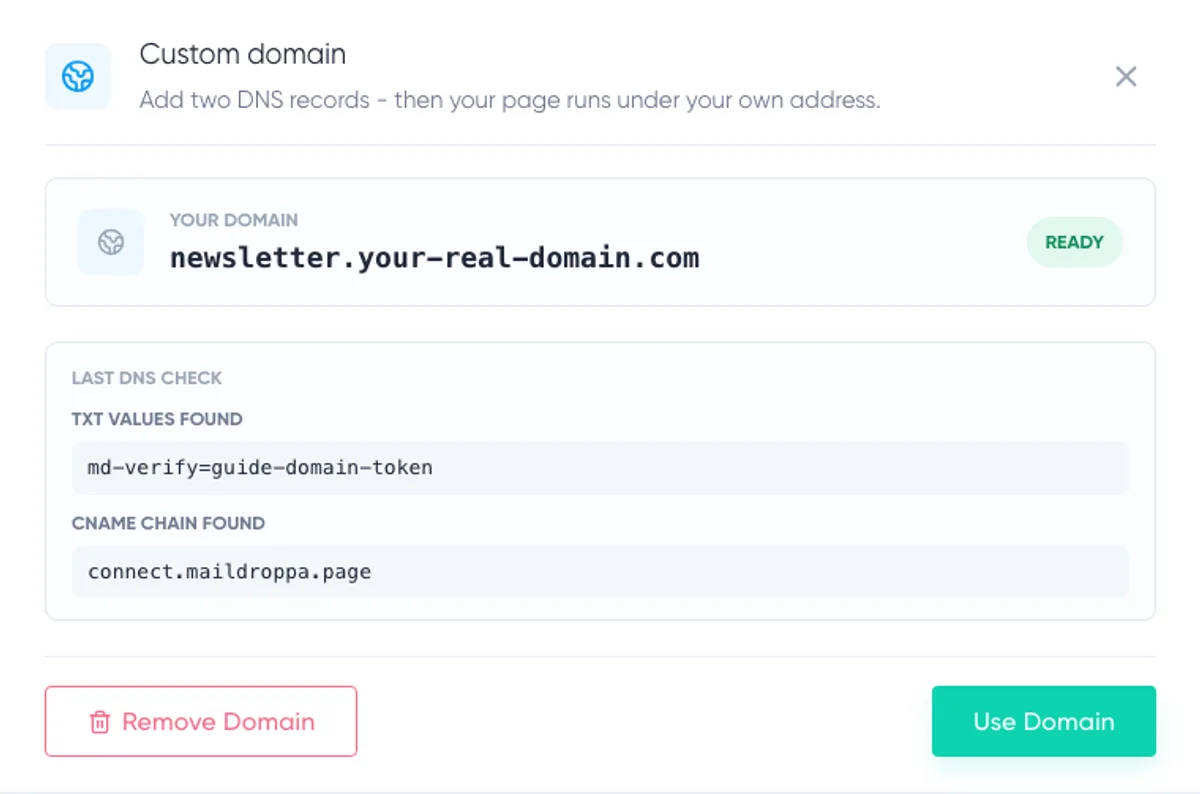
To connect, verify, or troubleshoot a custom domain, see Connect and Verify a Custom Landing Page Domain. You can continue publishing through your standard Maildroppa address while custom-domain verification is in progress. Once the domain is ready, select it, choose a unique path, and publish the page again.
Reviewing the Signup Flow
The publication window shows which signup flow the Landing Page uses and summarizes the visitor experience.
Review what happens after submission, which Double Opt-in email is sent, and what happens after confirmation. If the flow is incomplete or unsuitable for the current page, open “Signup flow settings” to select, create, or edit a flow.
Remember that a shared signup flow can be used by several forms. Editing it can therefore change the experience for other forms as well. Create a separate flow when the Landing Page needs its own confirmation text, email, or post-confirmation action.
Configuring the Search Preview
The Search Preview section controls how the page is described to search engines.
Enter an SEO title and SEO description that accurately explain the page. Choose the page language and decide whether the page should be shown in search results.
Disable “Show in search” when the page should remain available only to people who receive the direct link, such as a private campaign or a temporary registration page. This setting tells search engines not to index the page, but it does not make the link secret or password-protected.
Use a clear title rather than repeating the internal form name. The SEO description should briefly explain the offer and why someone should visit the page.
Adding a Social Sharing Image
The Social Sharing Preview section lets you provide the image used when the Landing Page link is shared by services that support link previews.
You can enter an image URL or upload an image. Choose a simple image that remains recognizable when displayed as a small preview. Text inside the image should be large enough to read.
Adding a Favicon
The favicon is the small icon shown in the browser tab and in other browser interface areas.
Enter a favicon URL or upload an image in the Favicon Branding section. A square, simple brand mark usually works best at this small size.
Completing the Hosted Page Legal Profile
Because Maildroppa hosts and publishes the Landing Page, the publication settings include a legal profile for the page.
The profile uses the postal address stored in your account and asks for the information required to identify and contact the page provider. Depending on your organization, this includes:
- Provider type
- Public contact email
- An optional additional contact method
- A provider information or legal notice URL when required
- A privacy URL when required
- Confirmation that you are responsible for the page content and legal information
Choose the provider type that matches your situation, such as sole proprietor or freelancer, company or partnership, association or non-profit, public body, or another organization.
If the postal address is missing or incorrect, use the link in this section to update it in your account settings. Maildroppa shows which legal requirements still need attention before the page can be published.
This feature helps you provide the necessary page information, but it does not replace legal advice about the requirements that apply to your business or country.
Publishing the Page
Review the “Ready to publish” section at the bottom of the publication window. Resolve every listed issue, then click “Publish”.
Maildroppa saves the current draft and publication settings before making the page public. After successful publication, you can:
- Open the live page
- Copy its public link
- Return to the editor
Open the live page once and test the complete signup journey yourself. Check the public address, layout, fields, validation, submit response, Double Opt-in email, and confirmation result.
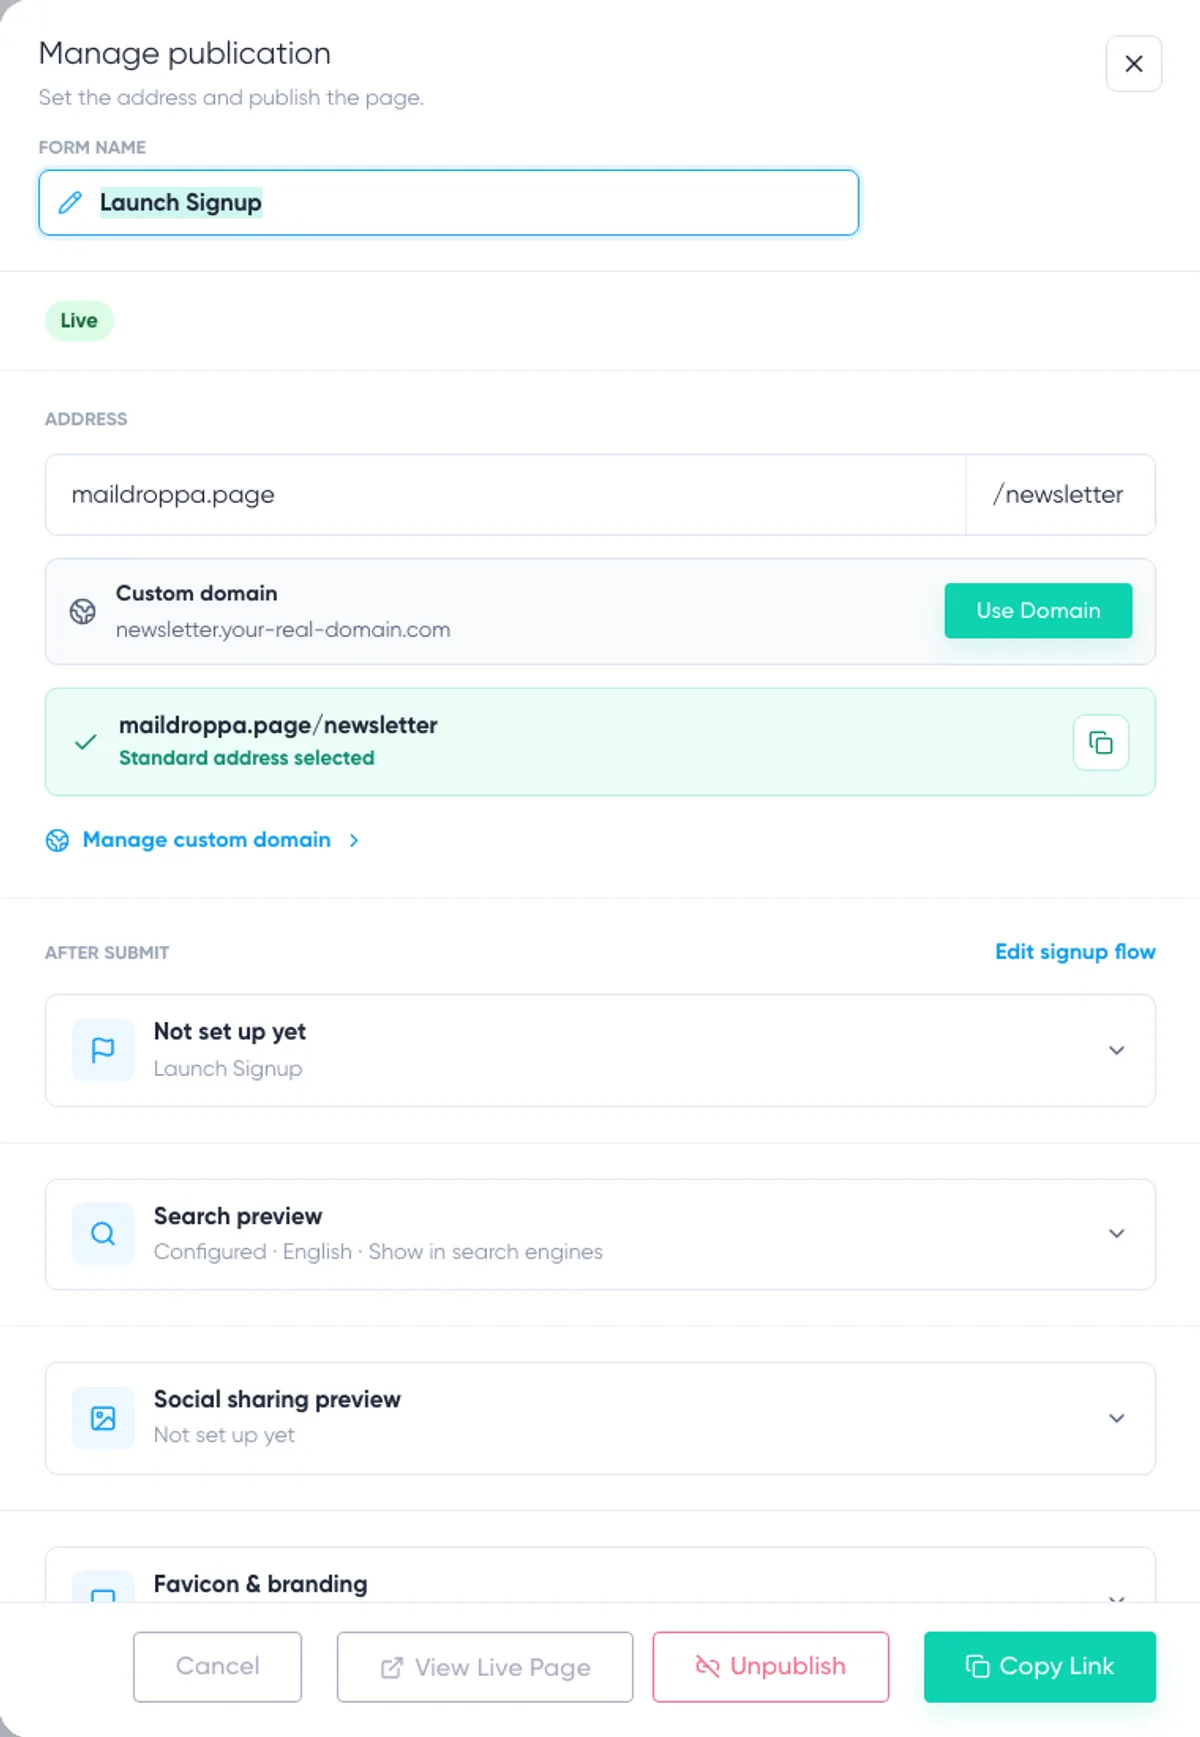
Managing a Published Page
After publication, use “Manage publication” in the builder or the actions in the Signup Forms Overview.
Publish changes replaces the live version with the current saved draft.
View live page opens the public version in a new browser tab.
Copy link copies the current public address.
Unpublish takes the page offline without deleting the Landing Page from your account. You can continue editing it and publish it again later.
The Signup Forms Overview shows whether a Landing Page is a draft, published, or not public and provides the appropriate sharing and management actions.
Ready to Send Better Emails?
Stop juggling bloated tools or overpriced plans. Maildroppa offers personal support, privacy-conscious controls, and powerful email marketing - starting free forever.
No credit card required. No time limit.